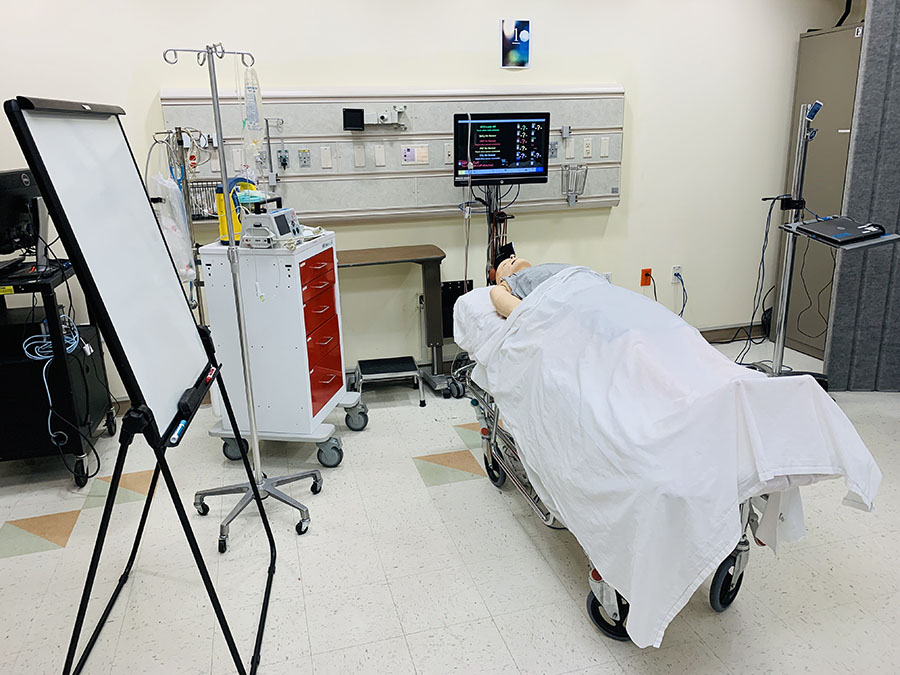
Simulation Room

Simulation Room

 simulation room with manikin
Simulation Room

The simulation room contains a patient manikin, patient monitor, IV pole with IV solution, emergency cart, and oxygen flowmeter.

Safety Warning: The emergency cart contains sharps (needle decompression syringe, advanced cardiac life support (ACLS) syringes contained in demo boxes, scalpel) and a real defibrillator that has the ability to emit electrical voltage.

  • Defibrillator
    • Do NOT turn on the defibrillator until you have received a safety orientation. This typically occurs in your third year Emergency Clerkship rotation.
  • Sharps
    • red sharps container is located in every simulation room. Use only this container to discard any sharps. Follow your facilitator’s guidance regarding sharps.

Equipment & Suppies

We still have our first working SimMan patient manikin from 2005!
Your patient manikin will be presented in an environment such as an emergency room, hospital ward or even an operating room. Learning to use the patient monitor, locate equipment and getting acquainted with the patient manikin can help you focus on the learning objectives.

Patient Manikin

Manikin Blinks and Breathes
Central Pulses
Peripheral Pulses
  • Eyes blink and may react to light (3G model)
  • Can talk but often the facilitator will be the patient’s voice
  • Breath sounds and heart tones that can change to reflect different diagnoses
  • Pulses
    • Central – bilateral carotid and femoral, LEFT brachial
    • Peripheral – bilateral radial (located more proximal than a human), dorsalis pedis
  • Moulage
    • Blue lips indicating cyanosis is available on our 3G manikin. Bruises, burns, and other signs may be placed on the manikin to suggest trauma, etc.

Patient Monitoring

patient monitor
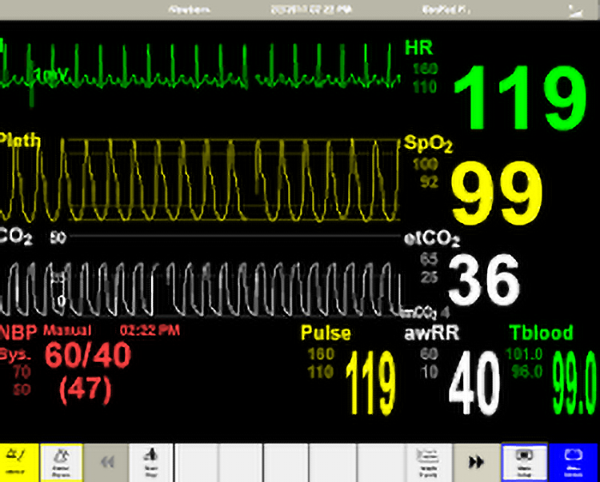
Patient Touchscreen Monitor

The patient monitor is a touchscreen. To see the vital signs, you should attach the ECG electrodes and BP cuff on the manikin and then enable the monitor. The oximeter waveform will show automatically as long as the patient has a pulse.

ECG Placement

ECG Placement
There are 3 ECG electrodes: white, black, red. A memorable way to remember placement is, “white on the right (patient’s right mid clavicular), smoke over fire (patient left side).” Attach the electrodes to the manikin and touch the touchscreen’s “touch when leads attached” text. Announce that you’ve attached the electrodes, and the rhythm if known.

Oximeter

Oximeter
Once the oximeter is placed on the finger, the waveform and SpO2 will show on the monitor. Announce that you’ve attached the oximeter and what the oxygen saturation level is.

Blood Pressure

Blood Pressure
Wrap the BP cuff around the upper arm. Touch the touchscreen’s text “touch when cuff attached.” A start/stop icon will appear on the bottom toolbar of the monitor. Touch the icon once to take a blood pressure. Announce the reading. You must touch the icon each time you want a new reading.

IV Fluids

IV Fluids

To ‘start’ an IV on your patient, tuck the end of the IV tubing into the white elastic band on the upper arm. Announce that you have started an IV.

Emergency Cart

Emergency Cart
  • Top of cart:
  • Bag-valve-mask
  • Defibrillator
  • Suction tubing

Drawers are labeled: Medication, Airway, Oxygen, IV

  • ACLS medications. Simply un-Velcro the empty syringe attached to the box and hold it near the patient’s IV line. Announce what medication and dose you are giving.
  • Airway equipment is for intubation, needle decompression and cricothyrotomies.
  • Oxygen equipment includes nasal cannula, simple mask, non-rebreather, nebulizer
  • Cervical Collar is located on the bottom of the cart

Oxygen Flowmeter

Oxygen Flowmeter

Connect oxygen devices to the flowmeter located on the wall. Increase the flow by turning the small green dial clockwise. You’ll see the metal ball float upwards as liters per minute of oxygen* is dispensed.

*NOTE: Our flowmeters dispense only Compressed Air